How to Hold a Pool Stick
This article is more than 2 years old
The pool is undoubtedly a very exciting, thrilling and interesting game that every age of people loves to play. You can be proud of yourself around your friends and be the coolest boy in your school by mastering it. Moreover, You can also impress your girlfriend by showing your accurate, perfect shots consistently in the game. In this article, we are discussing all the techniques, secrets, and rules on how to hold a pool stick.
Whether you are a beginner or amateur, there is no surprise that you can’t make accurate shots consistently. It is just because no one ever taught you before how to hold a pool cue properly and correctly. It is the fundamental and most crucial step of playing pool. If you do not understand this thing, then you are never going to be a good player of the pool. It may seem simple and useless, but it is not.
However, there are TECHNIQUES and rules through which you can master it to a new level just by practicing it in the right way. Let’s have a look at why it is important.
Importance of Holding the Pool Stick Correctly
From the start of the game, the Pool Cue is the main component through which you play pool all the way. It acts as a driving force of the whole pool game. Holding it a little wrong can make you ashamed in front of your friends and fellows.
However, when some people play the game, their entire focus is on hitting the cue ball that totally ruins their shots. It does not mean that you should not focus on hitting the game, but first, you should learn how to hold the pool stick correctly. Without learning the fundamentals of the game, you are never going to master it.
Just by holding the pool stick correctly, you increase the rate of your success by 40 percent. Moreover, you can also increase your steadiness, focus, and precision in the game. These are also very important.
The correct way to hold a pool stick
There are two things that every pool player needs to learn. No matter you are an amateur, beginner, or mastering it, surely there would be something that you are missing. You can increase your winning rate by going through these two things
1: Nailing down the fundamentals
2: Mastering the bridging techniques
Part 1: Nailing the fundamentals down
Without knowing basic rules, you are never going to make consistent shots. This is the main reason why even most of the intermediate level players face issues. This is such a frustrating situation where you want to give up.
However, you can change your situation and increase the chances of winning the game by learning basic rules as well. It includes the stance that you should have, the placement of your hands on cue, and how you should balance, etc.
Let’s get deep into the basics.
1: Be Mindful
Now you are ready to play, be mindful, and play it correctly by using the proper techniques and rules. This is the mindset of the winners that they always welcome the knowledge and challenges.
The amateurs also face little difficulty because they are now used to make mistakes, but everyone can do it. If you are on an intermediate level, accept that there was something wrong with your method and adapt yourself to the new change.
However, the pool does not need a lot of physical activity, but it requires strategies, techniques, and, most important, the right attitude to play the game.
DO’s
- Be determinant to play it correctly
DON’Ts
- Don’t hesitate to try working techniques
2: Choose the Best Pool Stick
The first and foremost step is to choose the right pool cue. When you play the game, the type and quality of the pool stick affect your shots the most. The right cue helps in making good shots. That is why it is important to have the right one.
Whether you are planning to use that one house pool stick or you are going to buy a new one, the right stick will be the one that works best for YOU! In the markets, there are many varieties of different sizes, weights, styles, and designs. DO NOT get confused here. These might be looking reliable, but they are not.
You should always go for the American or English pool stick. The choice may look simple, but it is effective.
English Pool Cues are wider from the bottom and gets narrower all the way long to the leather tip. Whereas American Pool Cues are also wider at the bottom, but they are partially narrow at the other end.
Most of you have their preference of either American or English pool stick. It would be best to try and see what you like the most. The best pool cue will be comfortable in your hands, and it will be easy to use.
DO’s
- Always try it with your own hands before investing money in it.
DON’Ts
- Avoid using the pool stick that others use. Always find which is comfortable in YOUR hands.
3: Hold the Cue with the Hand You Get Better Control and Feel Most Comfortable
In the old times, people used to say that it is best to hold the cue with the dominant hand. That means, if you are right-handed, hold the cue with the right hand, and if you are a lefty, hold it with left.
Over time, this concept went wrong. Many people get a better grip on cue while holding it with the hand other than the dominant one. It is common and completely normal.
Keep experimenting and find out which hand makes you feel most comfortable to hold the cue.
Mike Sigel is an American Professional Pool Player. In the 1980’s he won most of the tournaments. What interesting here is that Mike Sigel is left-handed in the pool and right-handed in life.
DO’s
- Try experimenting it with both hands. Then see which hands work best in playing the pool.
DON’Ts
- Try not to hold the cue with the hand you are not comfortable with.
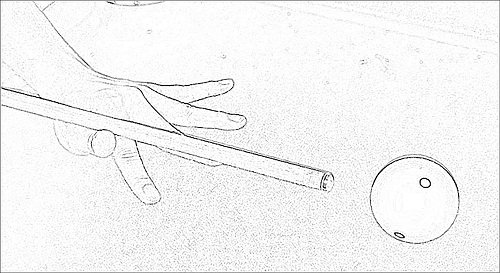
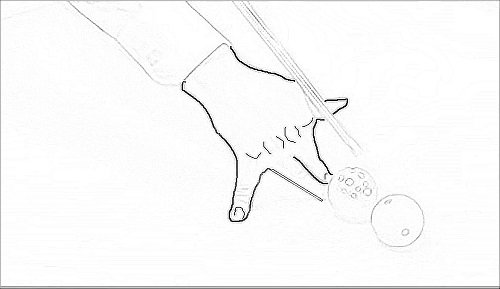
4: Placement of Hands on the Pool Stick
- Place the Pool-dominant hand on end the cue and hold it. The cue usually has a tape or some marking at the rear. It gives you a rough idea of the position of your hand. Look for it and move your hand behind the starting point of the tape/marking.
- Now take your hands approximately 4 to 5 inches away from the starting point of the tape. This is the ideal position of your hands.
- Try to keep the pool stick between your hip and waistline. Lastly, to make yourself more sure, look at your hand and see if your hand makes a 90-degree angle with the cue. This is a sign that you have correctly placed your hands on the cue.
- This is the most important step of playing pool. If you don’t do it correctly, you may ruin your shot.
DO’s
- Use the thumb and index finger to hold the pool stick. If you want a bit more grasp on cue, then you can also add your middle finger.
DON’Ts
- Do not hold it with your full hand. This does not work in the pool game.
5: Stance
About leg positioning here, we are giving you an example for a right-handed person in the pool. If you are lefty, you can reverse it.
- Stand in a place from where you are going to make a shot.
- Keep your legs slightly wider than hip-width.
- Find the straight line by pointing towards the place where you are aiming to shot the cue ball. Use your cue stick for this purpose.
- Lock your right leg in the same place.
- Move your left leg forward. While moving your left leg forward, you can rotate your right foot.
- Your feet should be in the direction of your shoot.
- Slightly bend your left leg and make sure they are at a distance of few inches.
DO’s
- Make sure your legs are relaxed.
DON’Ts
- Do not lean backward
6: Grip of the cue
How much grip one should apply on the cue is one of the important steps in the pool. It does not require physical activity, but your focus should be strong here. Most starters put a strong grip on cue. It is also called Death Grip. For God’s sake, DON’T DO it. Holding it too tight makes your muscles more tensed, and you increase the chances of hitting it anywhere other than where you want.
If you want to achieve the perfect hit, you must have to exert a perfect amount of energy. That means your grip on the pool stick should be controlled yet relaxed. It should feel natural so that you can easily move the stick like a pendulum. You can start practicing it with a very loose grip. Soon you will get the perfect grip over the cue.
However, do not get confused and tense. Take it easy and do it with a comfortable and relaxed mood.
DO’s
- Make your grip controlled as well as relaxed.
DON’Ts
- Do not hold the stick too tight. Otherwise, you will end up throwing the ball out of the pool.
7: Bent your upper body towards the table
After getting a proper grip on the pool stick, you will move down. In this way, you will imagine and focus on the shot by lining up with the cue ball. It is impossible to make a shot by standing and stiffing so you will bring down yourself. You can do this by holding the stick from the back with a Pool-dominant hand and gripping the down part of the cue with your other hand. Do not bridge the cue tip yet because a little mistaken force can drive the cue ball. Avoid blinking while constructing a shot and try to be motionless.
DO’s
- Always keep your body in-line with the cue ball. In this way, it would be easier to give a good shot.
DON’Ts
- Avoid falling on the table and keep your body balanced.
- Do not blink as you can strike the cue ball.
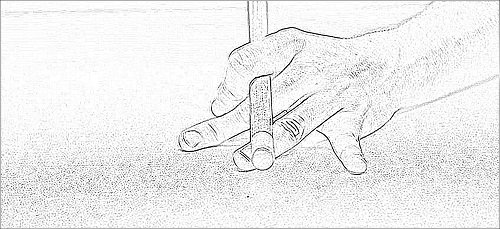
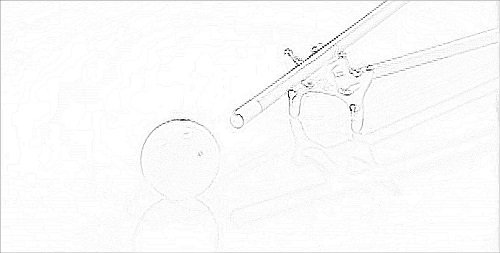
8: Making a bridge
Making a bridge is one of the most important parts of the game. When you are going to make one, point the cue tip at the cue ball first. Place your other hand on the table at a distance of 6-8 inches from the ball. However, the shots will be more precise as much as your hands are closer to the ball.
After placing your hands down, make a cradle or bridge with your hand. Through this, you will balance the cue on your hands and hit your shot. There are many bridges, and each one of them works best in a certain situation. Here we will guide you with the most common bridge first. The name of the bridge is an open bridge.
To make an open bridge, place your other hand on the table and spread your fingers wide.
After that, press the bottom thumb against the index finger. Now, use a pool-dominant hand to place the cue tip between index finger and thumb. After making a bridge, the point between the finger and thumb will look like a V sign. For better support, you can also use your middle finger.
Now, slide the cue between those fingers and thumb that looks like V.
You can raise or low down the arch of the hand to adjust the height of the cue tip. It gives you more control over your shot.
DO’s
- Try to place the hands close to the cue before making a bridge.
- Make sure that you are making a proper bridge. If you need more control and stability, you can add the middle finger to support
- Relax
- Make sure you open and spread the fingers wide enough when you place your hands down on the table.
DON’Ts
- Do not rush while making a bridge as you can injure and hurt your hand.
- Do not get tensed
- Do not tremble or move the hands. Otherwise, you will ruin your shoot.
8: Eyeing the ball
Now when you are leaning forward and have made the bridge, here comes the point to target and eye up the ball. Look for the direct line where you can picture, from the cue tip to the cue ball — and from the cue ball to the aimed point.
After that, the question comes that where should we hit the ball! Firstly, you should have the right grip on the cue. Secondly, there are many preferred points that we will discuss later. However, the ideal point to hit the ball in the dead center or sweet spot. Hitting at the center point increases the chances of your desired results.
DO’s
- Make sure that you can see the direct line between the cue ball and the object ball that you are gonna hit.
DON’Ts
- Don’t lose your body balance and keep it firm.
9: Taking a shot
Now the last part comes. You might be tense here because you are actually going to play.
All the steps, rules and instructions that we told you are going to work at this time. Your stance, how you held the cue and how you balanced your body–all of them make affects here.
Now when you are going to take the shot, slide the pool cue forward and backward just to make yourself sure that you are going to make it. If you get a feeling that there is something wrong or you have missed something that can affect your shot — readjust yourself.
After readjusting, stay firm, keep your balance, and again move the pool cue back and forth instead of taking a shot right away. It also helps in making you more steady and stable. Keep doing it until you are 100 percent sure that your bridge is perfect, the body is stable, and the shot that you are gonna make is actually how you want it.
Keep in mind that only your forearm should move like a pendulum while moving the stick and the rest of your body should stay the same.
Now make a shot by moving the stick back and then forward with enough force that will give you the desired result. While making a shot, remember that you are going to strike the ball lightly at its center so do not poke it.
DO’s
- After making a shot, try to stay in the same position for a few seconds.
- Make sure that your bridge is comfortable enough that you can smoothly slide the stick on the bridge. Tight bridges change your shot.
- When you hold the cue your thumb should be inside for the support and hands should grip the cue from outside. This provides you with better control over the cue.
- Use the thumb, index, and middle finger to hold the pool stick.
DON’Ts
- Do not move your body until you feel that the shot is finished.
- Do not hold the cue stick too tight. A strong grip causes the stick to jerk.
Part 2: Mastering the bridging techniques
If you are here, then you may know how much it is important to make a good bridge. Different bridges that are used at certain and different times. You can’t say that you are now a pool player without understanding the different bridges. We gave you the idea of an open bridge earlier. Now we will understand when and how to make all the cradles and bridges.
Open Bridge
As discussed earlier, it is the most common and easiest type of bridge. We are mentioning the steps down below to make learning easier for you
Step-by-Step Instructions
- Place your non-dominant hand of the pool on the table’s surface and spread the fingers. Wide them apart from each other
- Now hold the pool cue with the pool-dominant hand.
- The point between the index finger and thumb will make a V sign. Put your cue tip there.
- Now raise your thumb and cup the tip of the cue with your index finger.
- If you want more support then you can also use the middle finger. It will give you more grip.
This bridge is preferable if you are reaching for balls or going to shoot off the rail and over the balls.
Benefits of Open Bridge.
- It is easy to form.
- You can easily eye it up as you see more of the ball.
- Professionals also suggest this bridge.
- It works with any type of pool cue.
Closed Bridge
This technique is not common as an open bridge, but many people like to play by making this bridge. A closed bridge is a more advanced technique. People typically use it for more accented shots. If you are also comfortable with this bridge, you should go for it. Moreover, it will also make you look like a pro. In close bridge, you form a loop or circle to guide the shaft. That is why the close bridge only works if you use American Pool Cue. The shaft of American Pool Cue stays in the same size. The shaft of the English Pool Stick continuously gets thin. The extra space in the close bridge may misguide the stick.
Step by Step Instructions for Closed Bridge
- Make a fist and place it on the table.
- Spread your middle ring and pinky finger and leave the index finger tucked.
- Now lift the index finger and slide the thumb under the finger.
- Place your index finger over the thumb. It will create a loop.
- While keeping your thumb pressed against the index finger, slide the pool stick through the loop.
- The index finger should be on the inside and the thumb on the outside.
- Now, slide the stick several times to make sure that the circle is not too small.
- Now you are ready to take a shot.
Benefits of a closed bridge:
Your pool cue doesn’t move much and stay secure in the place.
The bridge stays in balance and gives you a good grip over the cue.
Rail Bridge
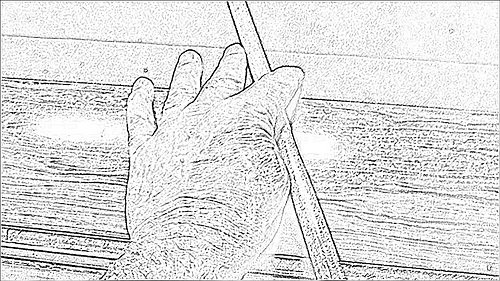
This technique only works when the ball is close to the rail, and your other hand has no space for a specific shot. Check if the cue ball is 4-6 inches away from the rail. If yes, then this bridge is the best choice
Step-by-Step Guide for Rail Bridge
- Put your non-dominant hand of the pool on the rail.
- Now use the normal open bridge technique for the shot. Put the cue in between your thumb and index finger.
- Now put your index finger over the cue. Do it in such a way that your cue comes in between the middle and index finger.
- Balance yourself and take a shot
Benefits of Rail Bridge:
This technique is a life-saver when you don’t have space for the shot, and the ball is near the rail.
Elevated Bridge
This is helpful when another ball blocks the way of your ball. While playing, most of the time, we face this situation, so it is best if you learn it.
Step by Step Instructions for Elevated Bridge
- Put your index finger perpendicular to it.
- Now place your pinkie finger and tuck down the ring and middle finger beneath the pinkie finger. It will look like a tripod.
- Lift your thumb up. This will make a V sign between your thumb and index finger in the air.
- Lastly, slide the cue on the V channel and take your shot.
Benefits of Elevated Bridge
This is proved to be very helpful even for professionals
Mechanical Bridge
A mechanical bridge is perfect for the time when your ball is too far away. It also proved to be beneficial for many other times.
Step by Step Instructions for Mechanical Bridge
- Place your mechanical bridge flat on the surface of the table. Make sure that the bridge is behind the cue ball.
- Now place the pool stick in the bridge area of your Mechanical Bridge. It will help you in taking the best shot.
- Slide the cue on the bridge back and forward.
- Move yourself down — line yourself up with the ball and take your shot.
Benefits of Mechanical Bridge
This bridge can be helpful on many other occasions
It works best when your ball is far away.
Final Words
The pool is a very exciting game. Any person can learn how to play but it is not a piece of cake. There are techniques and rules through which you make precise shots consistently. Cue is the fundamental of the game. How to hold a cue correctly is the most important part of learning pool. Choose the pool cue that works best for you. When you play it, make sure it is clean.
There are two parts of learning the pool— The Basics and Mastering the bridges. We have discussed it in detail. Now it is up to you to practice it. Practice makes a man perfect. The more you practice it, the more you increase the chances of winning the game. With the proper practice and the technique, it is guaranteed that you will win the game. So don’t waste your time and start working on your skills. J